Humanize IT - The Dispatch
Setup Guide
Humanize IT Platform settings - 3 easy steps.
- Log in with the account you used during the enrollment process.
- You can access the login screen from the 'Login button at the top left corner of the Humanize IT website, https://www.humanizeit.biz - OR -
- Directly at the Platform login screen - https://app.managedservicesplatform.com/login
-
- Upload a high-quality company logo.
- Add additional Team members
- Adjust your Currency symbol
- Next, go to Email Settings, and add your Email Domain
- Dispatches to your clients will show your domain.
- Integrations. Humanize IT supports integrations with many common platforms. Select 'Integrations and choose yours.
- Detailed Integration settings for each platform can be found here - Humanize IT Knowledge Base
Your Humanize IT Platform is now set up and ready!
Import or Create Clients
- Click on the top menu item 'Clients, then choose Clients from the drop-down list.
- Click on the 3-dot icon at the top right and choose either Create or Import.
- Creating Clients
- Enter the Client details
- Select a Segment and Account Manager
- The Goal, is a business focused objective your client is working towards.
- Using the Manage Integration field, you can
- Link manually created clients to PSA clients.
- Break the link to a client you have imported
- Link to a client in a different PSA (the Platform supports concurrent integration with all of our integration partners)
- Import Clients
- Choose the External System to link with
- If you are using more than 1 PSA, you can bring clients in from any of them.
- You can break the link at any time.
- You can re-link to the same Client or even one in a different PSA.
- Choose the External System to link with
- Once you have your Clients in the Platform, click on one to open the Client Home Screen
- Click the pencil icon in the Client Profile circle to change the image
- These images are used in client communications.
- Click the pencil icon in the Client Profile circle to change the image
- Creating Clients
Projects and Opportunities
- Use the Roadmap tab to manage Opportunities and Projects
- Select the Sync icon to bring in PSA objects

- Enable automatic Sync individually or for all
- Create Projects manually by selecting the + icon

- Choose from any of the Project Templates listed
- Once a Project is on a Client's Roadmap, you can customize any element.
- Manually created Projects can be pushed to your PSA as Opportunities or Projects.
- Manually created Projects can also be linked to existing PSA Projects or Opportunities.
- Choose from any of the Project Templates listed
- Select the Sync icon to bring in PSA objects
Import Assets
Assets can be imported from your PSA, RMM, or CSV file; you can even create them manually.
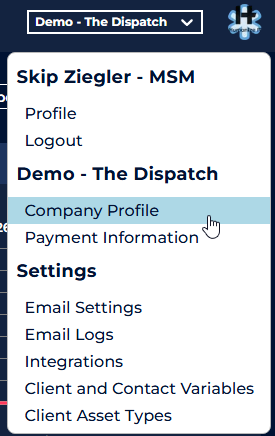
Once you have imported your first set of Assets, you will want to set your Global recommendations for Depreciation and Budgetary cost. Select your profile circle and then choose the option 'Client Asset Types.
Any time the Platform imports an Asset Type not already in the Asset Type list, it will add it. This list displays all Asset Types across all clients. (If there are not currently any assets of that type listed, it will have the option to delete it.)
Default Replacement Cost
- This is the standard replacement cost that you suggest clients use when working on their budgets. It is a budgetary value, not an exact cost, used to plan for future expenses.
- Use the cost that best applies to most of your clients
- To set a unique cost for a specific Client(s), select the filter.
- Budgetary costs are always estimates, but if you have clients who generally require a device that is higher or lower than normal, you can enter it here.
Depreciation Year
- This is the ideal lifespan of this asset before it needs to be replaced.
- Use the depreciation value that best applies to most of your clients
- The Depreciation date is calculated from the Asset's purchase date field
- You can adjust a client's depreciation values from the Client's Budget module
Once Cost and Depreciation values have been set, the Platform will automatically create a Budget for each client.
The Budget will be comprised of the Client's Assets and Projects on their Roadmap. You can view, adjust, and discuss using the Budget tab from the Client Home screen.
Check out more information on using the Budget module here:
-
- Build a Budget
- Once you have discussed the Budget with your Client, you can send a Budgetary Proposal for their review and approval. Your Client's response will update the Roadmap. Send a Proposal
Using Personas
Personas enable you to have the right conversation with the right people. You can use one of our pre-built templates or create your own. Building Personas. Personas are not limited to being used in email updates. Share your screen and use a Persona to facilitate a Client engagement; it keeps your conversation focused while providing topic-specific information in a simple top-down meeting format. After a Client engagement, you can enable additional access, allowing your Client to access the Persona on demand!
- To switch Personas, click the Persona button on the Client Home screen. You will be able to access all the Personas available for that Client.

- Use the double chevron icon to apply a Persona
- Global Personas are available to be applied to any Client
- Local Personas can only be applied to the Client under which they were saved.
- You can apply a Global Persona and then edit or customize it, and then save it as a Local Persona.
- Share the Persona with your Client

- You can enable on-demand access to a Persona with a Tokenized Link or SSO authentication. View all of the details here - Persona Sharing
- To enable a Persona to be emailed as a digest
- Select the Persona you want to share from the drop-down list.
- Enable Email Digest

- Enter the address of everyone you want to receive this digest
- You can utilize any of the Template Variables to customize the Subject and Message.
- The Template Variables enable you to create Global Personas that can be sent to any client, yet still have Client-specific details.
- You can then click Send Now or set up a recurring Schedule.
- Since Personas are built to have the right conversation with the right people, you can set up different digests. Each one can have its own appropriate schedule.
- Utilize a Personas that is focused on operational information to send to client staff members responsible for day-to-day operations
- Utilize a Persona focused on longer-term planning and strategic goals to staff responsible for leading the organization.
- Since Personas are built to have the right conversation with the right people, you can set up different digests. Each one can have its own appropriate schedule.
- Personas are powerful tools that can drive client engagement with focused information from multiple areas. Be sure to check out more details about using Personas in these KBs.